This article shows how to correct the one major flaw in the Portacine 35mm projector: The tendency for sound to be reproduced with noticable flutter, especially when running polyester film.
The Portacine is Cinemeccanica's portable projector, manufactured in the 1980s. It shares most of the design and parts with the full size Victoria line of projectors, but with one notable difference: the soundhead is simplified, lacking a lay-on roller on the sound drum, and instead featuring a series of three rollers (one of which does not rotate) close to each other right before the sound drum, intended to stabilize the film after the intermittent.
This worked well enough when the machine was made, but since the late 1990s most release prints are on polyester base, which, as many Portacine users have noticed, does not behave well with this soundhead design. Exactly why that is, I don't know. It might be because polyester is slightly thinner than acetate. But fortunately, there is a fairly simple way to fix it.
The solution I have devised is to add a mechanism that provides some drag on the film between the intermittent and the soundhead. The parts needed to build this modification are:
- a 16 tooth sprocket; here, we assume a Cinemeccanica intermittent type sprocket (part number 001). We call this the drag sprocket.
- a pair of bearings, for installing the drag sprocket on a 6mm shaft. If you use a 001 sprocket, you need outside diameter 8mm, bore diameter 6mm, exact width unimportant.
- a small piece of wood, from which we will fashion the part we call the brake.
- a screw that fits into the shaft that we mount the sprocket on. It needs to be a couple cm long. One with a big head is ideal, so you can comfortably adjust it by hand. If you have a spare parts Portacine or Victoria machine, the gate pad stop spindle (part number E-510) is perfect. We call this the adjustment screw.
- a small spring to push the brake against the side of the drag sprocket. Again, if you have a parts machine, one of the springs from the gate assembly is perfect (part number 0027b).
- a small nail or similar, which we call the preventer pin.
The first step is to fashion the wooden brake to provide friction against the sprocket, causing drag on the film to accomplish our objective. The idea is for one end of the brake to touch the side of the drag sprocket with a smooth, even, and as large a surface area as practical. If you use the 001 as a drag sprocket, you must make this end of the brake tube-shaped; inner diameter ca 10 mm, outer diameter no more than 12 mm. We don't want the brake to touch the flanges of the sprocket, only the side.
The other end of the brake must have a hole for the adjustment screw, centered with respect to the tube shape of the other end, so as to make the brake mate properly with the sprocket.
I used very soft balsa wood which is easy to work with and good for the purpose. If you use some harder type of wood or other material, it might be a good idea to put a piece of felt on it to provide the friction.
We will install all this in place of the flanged roller right after the intermittent. Remove this roller; the installation might be easier if you remove the shaft also, depending on what type of bearings you have. I used plain bearings that I pressed into the sprocket bore, and then just slid the sprocket onto the shaft. In any case, you need to loosen the screw that keeps the shaft fixed in its housing, and adjust the shaft laterally, so our drag sprocket becomes perfectly aligned with the intermittent.
Now we are ready to place the brake on the side of the sprocket, and fasten it with the adjustment screw. Put the spring around the screw also. Do not yet tighten it more than necessary to keep everything in place.
Then install the preventer pin, which prevents the brake from rotating together with the sprocket. Since I used soft balsa wood and a thin nail, I was able to simply push the nail into the brake. If you use harder wood, you might need to remove it to hammer it in, but check now exactly where to put it. It needs to be perpendicular to the sprocket shaft, and placed so that it leans against the shaft of the intermittent pad roller.
After you have everything in place, the friction must be properly adjusted. First, adjust the tension of the wow suppressor slightly higher than you're used to. (The wow suppressor is the pair of spring loaded rollers right after the sound drum.) These are supposed to sit horizontally under normal running. The idea of tightening them a little now, is so they won't enter the desired horizontal position without the help of some drag from our newly installed mechanism.
Then, thread a film and start the projector. Slowly tighten the brake using the adjustment screw. Watch the wow suppressor as you do this; at some point, the rollers should become horizontal, and at this point you should also have perfect sound reproduction, with no flutter.
If you tighten the brake too much, the film will start jumping over the sprocket teeth, in the absence of a pad roller on the drag sprocket. This is very bad; at the very least it will scratch the Dolby Digital track, and possibly also damage perfs. So if this happens, immediately back off a bit. If this happens before the rollers are horizontal, you have tightened the wow suppressor too much. Ease up a little there.
If the rollers get horizontal but you still hear flutter, you might not have tightened the wow suppressor enough.
If the flutter does not disappear even with close to maximum drag (without the film "jumping"), you have some other problem. First guess: worn sound drum bearings.
Notes
- It would be nice to have a pad roller on the drag sprocket, but it would not easily fit, and would be quite difficult to install in perfect alignment as a DIY project.
- The very first version of the Portacine did not have a wow suppressor. I am not sure how well this modification would work there. If you have such a machine, you may be out of luck.
- The last version of the Portacine had a better sound drum, one that only touches the edges of the film, and a lay on roller on top of that, like Victoria machines. These should have good sound reproduction without the need for my modifications.
- The better sound drum was also part of the reverse scan kit available from Cinemeccanica. I am doubtful this could work properly without a lay-on roller (which was not part of the kit), because the area of contact is so much smaller. I have installed reverse scan in my own machine, but without replacing the drum. If someone has installed the new drum, and use it without a lay-on roller, I would be very interested in knowing how well it works, with or without my suggested modifications.
- I have seen another DIY solution to this problem, which involved a lay-on roller on the old-style sound drum. I am not familiar with the details of that setup, but I would think this roller would have to touch the picture area of the emulsion side of the film, and I would not be comfortable with that. I think my solution is safer.
Fredrik Sandström 2016
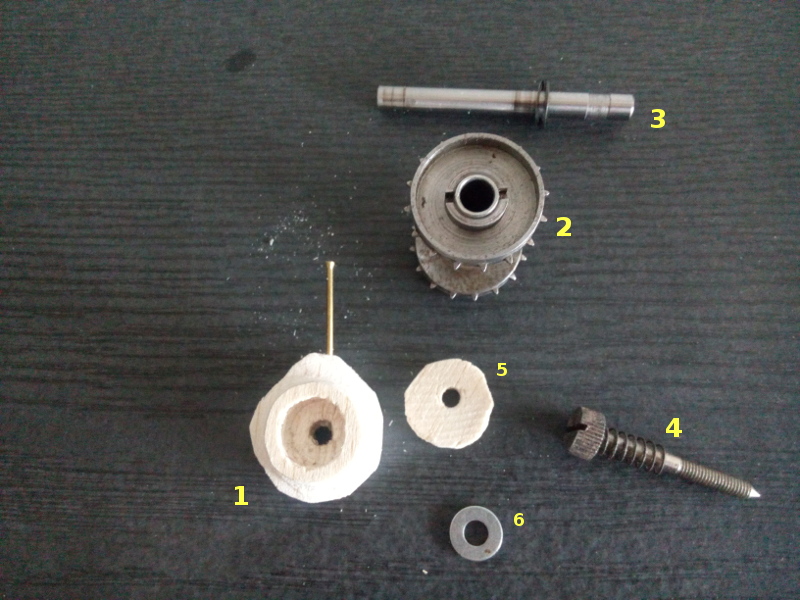 The soundhead fix ready to be installed onto the projector:
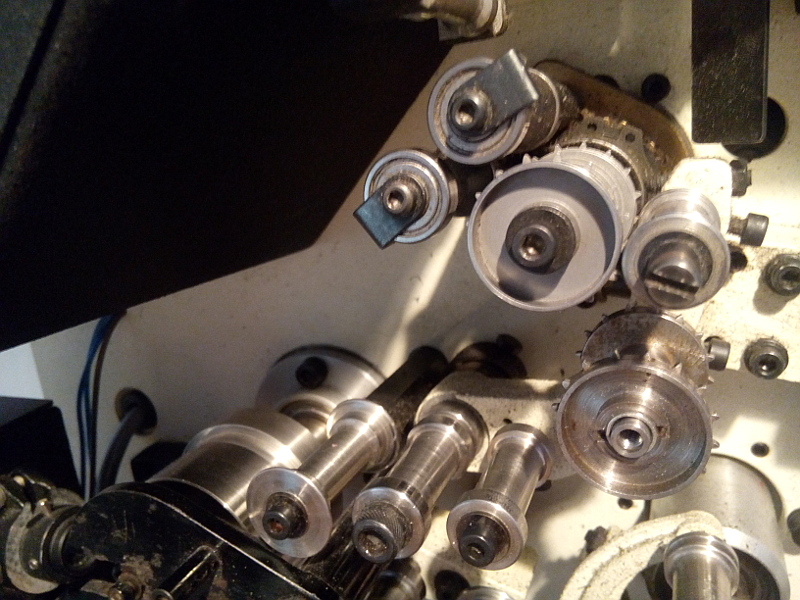
 The bare shaft visible here, which originally had a flanged roller, is where we install the fix.
 The drag sprocket has been fitted on the shaft.
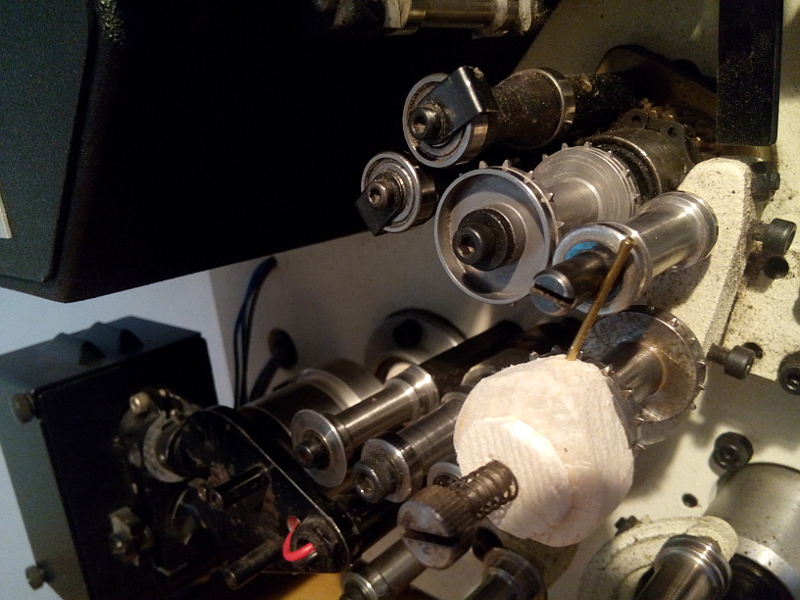 The brake, adjustment screw, and spring have been fastened on the
side of the drag sprocket. Note the preventer pin leaning on the shaft
of the intermittent pad roller. To thread, simply turn the drag
sprocket one quarter revolution clockwise to get the pin out of the
way, and slide the film in.
The brake, adjustment screw, and spring have been fastened on the
side of the drag sprocket. Note the preventer pin leaning on the shaft
of the intermittent pad roller. To thread, simply turn the drag
sprocket one quarter revolution clockwise to get the pin out of the
way, and slide the film in.